本渲染器已完全重构,与之前版本大不相同,详情移步至TinySoftRenderer 。
obj模型导入
Blinn-Phong光照着色
虚拟场景漫游
程序结果
结语
一、obj模型导入 obj模型文件(这里不是指c++编译得到的.o中间文件)是一种格式简单、清晰的模型文件,这种模型的格式非常容易解析。目前有一个非常流行的开源的模型导入库Assimp ,封装了各种各样模型文件的加载,省去很多麻烦。而我因为一方面为了尽量避免引入第三方库,另一方面obj模型的导入不难,所以自己实现了一个obj加载类$ObjModel$。实现obj模型加载并不难,只需简单了解一下obj文件的格式即可。
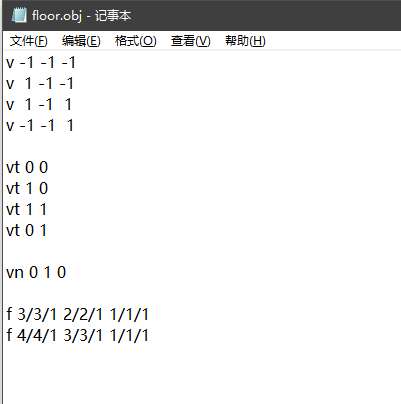
obj文件格式有类数据,一类一行,分别以v、vt、vn和f开头。用记事本打开一个简单的obj文件,如下所示:
以v(即vertex的缩写)开头的一行分别为模型顶点的$x$、$y$、$z$坐标,以vt(即vertex texcoord的缩写)开头的一行分别为纹理坐标的$u$、$v$值,以vn(即vertex normal的缩写)开头的一行分别是法向量的$x$、$y$、$z$值。而f(即face的缩写)格式为v/vt/vn,其中对应的是各自的索引值,一个v/vt/vn描述了一个三角形顶点的顶点坐标、纹理坐标、法线向量,通常以f的一行有三列v/vt/vn,组成一个三角形面片。所以我们读取的时候按照这些开头标记读取即可。
1
2
3
4
5
6
7
8
9
10
11
12
13
14
15
16
17
18
19
20
21
22
23
24
25
26
27
28
29
30
31
32
33
34
35
36
37
38
39
40
41
42
43
44
45
46
47
48
49
50
51
52
53
54
55
56
57
58
59
60
61
62
63
64
65
66
67
68
69
70
71
72
73
74
75
76
77
78
79
80
81
82
83
84
85
86
87
88
89
90
91
92
93
94
class ObjModel :public Mesh{ private : Vector3D minPoint, maxPoint; public : ObjModel(const std ::string &path); virtual ~ObjModel(); Vector3D setSizeToVector (float sx, float sy, float sz) const ; Matrix4x4 setSizeToMatrix (float sx, float sy, float sz) const ; private : void loadObjFile (const std ::string &path) }; void ObjModel::loadObjFile(const std ::string &path){ ifstream in; in.open(path, ifstream::in); if (in.fail()) { std ::cout << "Fail to load obj->" << path << endl ; } string line; minPoint = Vector3D(+10000000000 ,+10000000000 ,+10000000000 ); maxPoint = Vector3D(-10000000000 ,-10000000000 ,-10000000000 ); vector <Vector3D> vertices; vector <Vector3D> normals; vector <Vector2D> texcoords; while (!in.eof()) { getline(in, line); istringstream iss (line.c_str()) char trash; if (!line.compare(0 , 2 , "v " )) { iss >> trash; Vector3D vertex; iss >> vertex.x; iss >> vertex.y; iss >> vertex.z; vertices.push_back(vertex); if (minPoint.x > vertex.x)minPoint.x = vertex.x; if (minPoint.y > vertex.y)minPoint.y = vertex.y; if (minPoint.z > vertex.z)minPoint.z = vertex.z; if (maxPoint.x < vertex.x)maxPoint.x = vertex.x; if (maxPoint.y < vertex.y)maxPoint.y = vertex.y; if (maxPoint.z < vertex.z)maxPoint.z = vertex.z; } else if (!line.compare(0 , 3 , "vn " )) { iss >> trash >> trash; Vector3D normal; iss >> normal.x; iss >> normal.y; iss >> normal.z; normal.normalize(); normals.push_back(normal); } else if (!line.compare(0 , 3 , "vt " )) { iss >> trash >> trash; Vector2D texcoord; iss >> texcoord.x; iss >> texcoord.y; texcoords.push_back(texcoord); } else if (!line.compare(0 , 2 , "f " )) { iss >> trash; int index[3 ]; while (iss >> index[0 ] >> trash >> index[1 ] >> trash >> index[2 ]) { Vertex data; data.position = vertices[index[0 ] - 1 ]; data.texcoord = texcoords[index[1 ] - 1 ]; data.normal = normals[index[2 ] - 1 ]; data.color = Vector4D(1.0 ,1.0 ,1.0 ,1.0 ); m_indices.push_back(m_vertices.size()); m_vertices.push_back(data); } } } in.close(); }
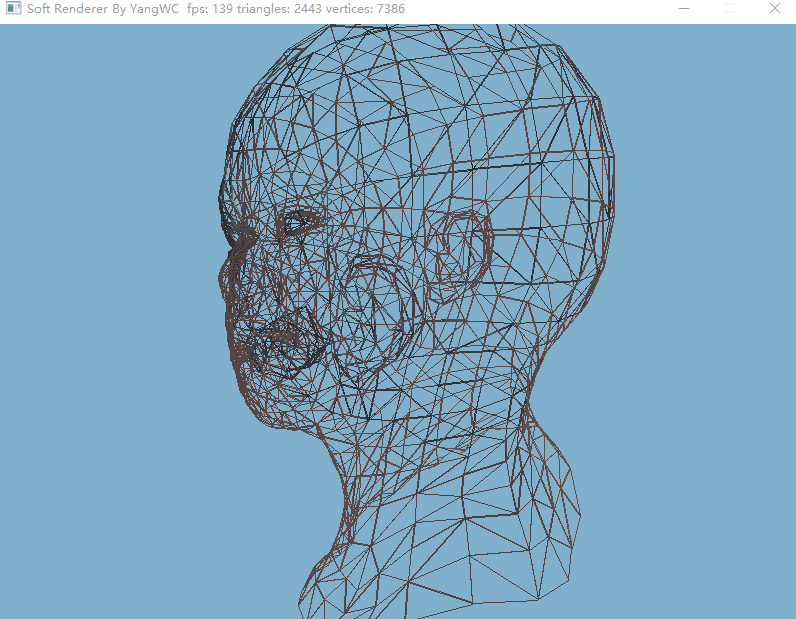
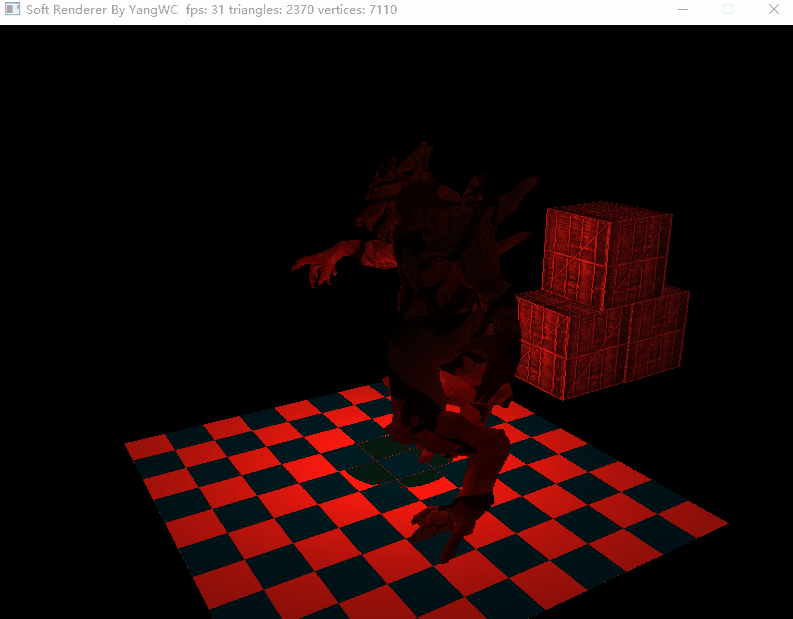
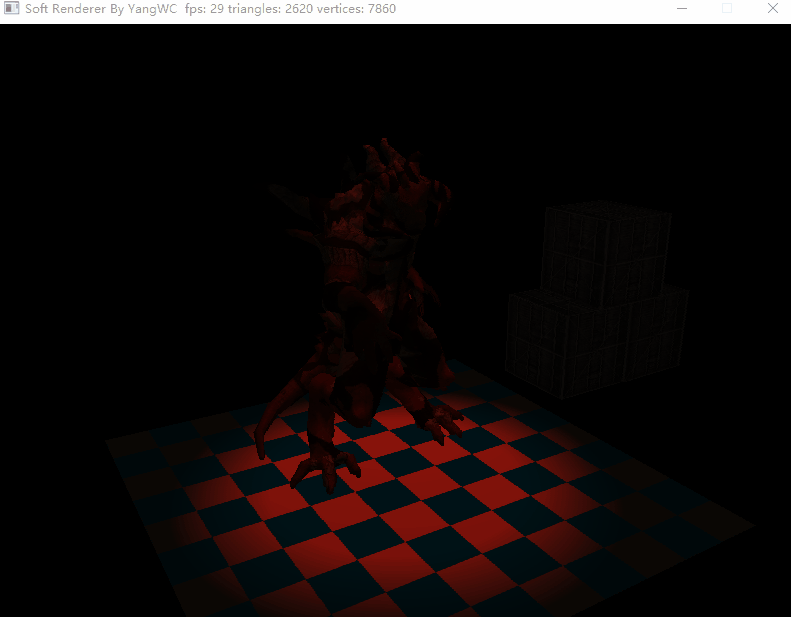
可以看到这里继承了父类$Mesh$,这样读进来就作为一个网格类,能够传进渲染管线中渲染。测试读取了几个模型文件,效果如下:
二、Blin-Phong光照着色 之前我们的着色器一直都是直接传输数据,没有做一些着色器计算,这里我们给渲染出来的模型加上光照着色。采用的光照模型是Blinn-Phong光照模型,并实现了两种着色器方法,分别是Gouraud着色、Phong着色。注意别混淆了光照模型和着色模型,光照模型是一种理论模型,着色模型则是具体的实现方式。Gouraud着色和Phong着色都是采用Blinn-Phong光照模型,差别在于两者在何处实现光照计算。
网上的LearnOpenGL教程很详细地介绍了Phong光照模型以及Blinn-Phong光照(Phong和Blinnn的差别只在于高光计算的一小部分),我就不再说太多这些方面的东西了,想具体了解的朋友请看这里 )和这里 )。概括起来,Phong光照模型包含环境光、漫反射光和镜面高光,其计算方式如下:
其中的$k_a$、$k_d$和$k_s$分别为物体的环境光颜色、漫反射颜色和镜面高光颜色数,$n$是物体的高光读,而$I_a$、$I_e$和$I_s$是光源的环境光颜色、漫反射照亮的颜色和镜面反射的颜色。针对物体材质和光照的种类,我们创建一个$Material$和虚类$Light$,并把光照的计算过程抽象为一个函数$lighting$:
1
2
3
4
5
6
7
8
9
10
11
12
13
14
15
16
17
18
19
20
21
22
23
24
25
26
27
28
29
30
31
32
33
class Material { public : Material() = default ; ~Material() = default ; double m_shininess; Vector3D m_ambient; Vector3D m_diffuse; Vector3D m_specular; Vector3D m_reflect; void setMaterial (Vector3D _amb, Vector3D _diff, Vector3D _spec, double _shin) { m_shininess = _shin; m_ambient = _amb; m_diffuse = _diff; m_specular = _spec; } }; class Light { public : Light() = default ; virtual ~Light() = default ; virtual void lighting (const Material &material, const Vector3D &position, const Vector3D &normal, const Vector3D &eyeDir, Vector3D& ambient, Vector3D& diffuse, Vector3D& specular) const 0 ;};
根据光源的种类不同,通常有平行光、点光源和聚束光三类(关于这类光,请看LearnOpenGL的这篇 ))。平行光的特点就是光线束都是平行的,因而只需记录平行光的方向即可:
1
2
3
4
5
6
7
8
9
10
11
12
13
14
15
16
17
18
19
20
21
22
23
24
25
26
27
28
29
30
31
32
33
34
35
36
37
38
39
40
41
42
43
class DirectionalLight :public Light{ public : Vector3D m_ambient; Vector3D m_diffuse; Vector3D m_specular; Vector3D m_direction; virtual void lighting (const Material &material, const Vector3D &position, const Vector3D &normal, const Vector3D &eyeDir, Vector3D& ambient, Vector3D& diffuse, Vector3D& specular) const void setDirectionalLight (Vector3D _amb, Vector3D _diff, Vector3D _spec, Vector3D _dir) { m_ambient = _amb; m_diffuse = _diff; m_specular = _spec; m_direction = _dir; m_direction.normalize(); } }; void DirectionalLight::lighting(const Material &material, const Vector3D &position, const Vector3D &normal, const Vector3D &eyeDir, Vector3D &ambient, Vector3D &diffuse, Vector3D &specular) const { float diff = max(normal.dotProduct(-this ->m_direction), 0.0f ); Vector3D halfwayDir = eyeDir + this ->m_direction; halfwayDir.normalize(); float spec = pow (max(eyeDir.dotProduct(halfwayDir), 0.0f ), material.m_shininess); ambient = m_ambient; diffuse = m_diffuse * diff; specular = m_specular * spec; }
点光源则需要记录光源的位置,用以计算光照的方向。与平行光还有一点不同的是,点光源通常有个照明区域范围,光照的强度随着距离的增加而削弱,且这类减弱不是线性的。因此我们还要衰减因子,把计算得到的光照颜色再乘上这个衰减因子:
1
2
3
4
5
6
7
8
9
10
11
12
13
14
15
16
17
18
19
20
21
22
23
24
25
26
27
28
29
30
31
32
33
34
35
36
37
38
39
40
41
42
43
44
45
46
47
48
49
50
51
52
53
54
55
56
57
58
59
60
class PointLight :public Light{ public : Vector3D m_ambient; Vector3D m_diffuse; Vector3D m_specular; Vector3D m_position; Vector3D m_attenuation; virtual void lighting (const Material &material, const Vector3D &position, const Vector3D &normal, const Vector3D &eyeDir, Vector3D& ambient, Vector3D& diffuse, Vector3D& specular) const void setPointLight (Vector3D _amb, Vector3D _diff, Vector3D _spec, Vector3D _pos, Vector3D _atte) { m_ambient = _amb; m_diffuse = _diff; m_specular = _spec; m_position = _pos; m_attenuation = _atte; } }; void PointLight::lighting(const Material &material, const Vector3D &position, const Vector3D &normal, const Vector3D &eyeDir, Vector3D &ambient, Vector3D &diffuse, Vector3D &specular) const { ambient = this ->m_ambient; Vector3D lightDir = (this ->m_position - position); lightDir.normalize(); float diff = max(normal.dotProduct(lightDir), 0.0f ); diffuse = this ->m_diffuse * diff; Vector3D halfwayDir = eyeDir + lightDir; halfwayDir.normalize(); float spec = pow (max(eyeDir.dotProduct(halfwayDir), 0.0f ), material.m_shininess); specular = this ->m_specular * spec; float distance = (this ->m_position - position).getLength(); float attenuation = 1.0 / (m_attenuation.x + m_attenuation.y * distance + m_attenuation.z * (distance * distance)); ambient *= attenuation; diffuse *= attenuation; specular *= attenuation; }
聚束光是一种比较特殊的光源(例如手电筒光、舞台灯光),它的特点就是只有在聚光方向的特定半径内的物体才会被照亮,其它的物体都会保持黑暗。我们采用一个光源位置、照明方向和切光角来描述一个聚光灯:
1
2
3
4
5
6
7
8
9
10
11
12
13
14
15
16
17
18
19
20
21
22
23
24
25
26
27
28
29
30
31
32
33
34
35
36
37
38
39
40
41
42
43
44
45
46
47
48
49
50
51
52
53
54
55
56
57
58
59
60
61
62
63
64
65
66
67
68
69
70
71
72
73
74
75
class SpotLight :public Light{ public : double m_cutoff, m_outcutoff; Vector3D m_ambient; Vector3D m_diffuse; Vector3D m_specular; Vector3D m_position; Vector3D m_direction; Vector3D m_attenuation; virtual void lighting (const Material &material, const Vector3D &position, const Vector3D &normal, const Vector3D &eyeDir, Vector3D& ambient, Vector3D& diffuse, Vector3D& specular) const void setSpotLight (Vector3D _amb, Vector3D _diff, Vector3D _spec, double _cut, Vector3D _pos, Vector3D _dir, Vector3D _atte) { m_cutoff = cos (_cut * M_PI/180.0 ); m_outcutoff = cos ((_cut + 10.0 ) * M_PI/180.0 ); m_ambient = _amb; m_diffuse = _diff; m_specular = _spec; m_position = _pos; m_direction = _dir; m_attenuation = _atte; m_direction.normalize(); } }; void SpotLight::lighting(const Material &material, const Vector3D &position, const Vector3D &normal, const Vector3D &eyeDir, Vector3D &ambient, Vector3D &diffuse, Vector3D &specular) const { ambient = this ->m_ambient; Vector3D lightDir = this ->m_position - position; lightDir.normalize(); float diff = max(normal.dotProduct(lightDir), 0.0f ); diffuse = this ->m_diffuse * diff ; Vector3D halfwayDir = eyeDir + lightDir; halfwayDir.normalize(); float spec = pow (max(eyeDir.dotProduct(halfwayDir), 0.0f ), material.m_shininess); specular = this ->m_specular * spec; float theta = lightDir.dotProduct(-this ->m_direction); float epsilon = (this ->m_cutoff - this ->m_outcutoff); float intensity = (theta - this ->m_outcutoff) / epsilon; if (intensity < 0.0f )intensity = 0.0f ; if (intensity > 1.0f )intensity = 1.0f ; diffuse *= intensity; specular *= intensity; float distance = (this ->m_position - position).getLength(); float attenuation = 1.0 / (m_attenuation.x + m_attenuation.y * distance + m_attenuation.z * (distance * distance)); ambient *= attenuation; diffuse *= attenuation; specular *= attenuation; }
然后我们就需要把光照计算集成到着色器中,这里提供了两种方式:光照计算集成到顶点着色器,即Gouraud着色方法,逐顶点光照,然后靠线性插值得到每个像素的光照颜色;光照计算集成到片元着色器,即Phong着色法,逐像素光照,根据插值得到的法向量做相应的计算。显然前者计算量少了很多,但是后者更为真实。我们建立一个$Gouraud$着色类如下:
1
2
3
4
5
6
7
8
9
10
11
12
13
14
15
16
17
18
19
20
21
22
23
24
25
26
27
28
29
30
31
32
33
class GouraudShader :public BaseShader{ private : const Light *m_light; const Material *m_material; const Texture2D *m_unit; Vector3D m_eyePos; Matrix4x4 m_modelMatrix; Matrix4x4 m_viewMatrix; Matrix4x4 m_projectMatrix; Matrix4x4 m_invModelMatrix; public : GouraudShader(); virtual ~GouraudShader() = default ; virtual VertexOut vertexShader (const Vertex &in) virtual Vector4D fragmentShader (const VertexOut &in) virtual void bindShaderUnit (Texture2D *unit) virtual void setModelMatrix (const Matrix4x4 &world) {m_modelMatrix = world;m_invModelMatrix = m_modelMatrix.getInverseTranspose();} virtual void setViewMatrix (const Matrix4x4 &view) virtual void setProjectMatrix (const Matrix4x4 &project) virtual void setMaterial (const Material *material) virtual void setLight (const Light *light) virtual void setEyePos (const Vector3D eye) };
这里提一下关于顶点法向量的变换矩阵。我们目前已经有顶点的model矩阵,但是顶点做变换之后的法向量却不能直接乘上model矩阵获得。我们知道顶点的切线与法线相互垂直,因而它们的点乘为$0$,即有:
顶点切线必然随着模型矩阵的变换而变换,即模型矩阵为$M$,因而变换后的切线$T’=M\cdot T$。我们记变换后的法向量为$N’$,其正确的法线变换为$Q$,则$N’=Q\cdot N$,那么变换后$N’$和$T’$应该依旧保持垂直关系,依旧有$N’\cdot T’=(Q\cdot N)\cdot (M\cdot T)=(Q\cdot N)^T\cdot (M\cdot T)=N^T\cdot (Q^T\cdot M)\cdot T$,与公式$(2)$对比,我们只要令$Q^T\cdot M = I$结果为单位矩阵,则有$N’\cdot T’=N\cdot T = 0$。从而可得法线的变换矩阵为:
1
2
3
4
5
6
7
8
9
10
11
12
13
14
15
16
17
18
19
20
21
22
23
24
25
26
27
28
29
30
31
32
33
34
35
36
37
38
39
40
41
42
43
44
45
VertexOut GouraudShader::vertexShader(const Vertex &in) { VertexOut result; result.posTrans = m_modelMatrix * in.position; result.posH = m_projectMatrix * m_viewMatrix * result.posTrans; result.color = in.color; result.texcoord = in.texcoord; result.normal = m_invModelMatrix * Vector4D(in.normal); if (m_unit) result.color = m_unit->sample(result.texcoord); Vector3D _amb, _diff, _spec; if (m_light) { Vector3D eyeDir = m_eyePos - result.posTrans; eyeDir.normalize(); m_light->lighting(*m_material, result.posTrans, result.normal, eyeDir, _amb, _diff, _spec); result.color.x *= (_amb.x + _diff.x + _spec.x); result.color.y *= (_amb.y + _diff.y + _spec.y); result.color.z *= (_amb.z + _diff.z + _spec.z); result.color.w = 1.0f ; } result.oneDivZ = 1.0 / result.posH.w; result.posTrans *= result.oneDivZ; result.texcoord *= result.oneDivZ; result.color *= result.oneDivZ; return result; } Vector4D GouraudShader::fragmentShader(const VertexOut &in) { Vector4D litColor = in.color; return litColor; }
Phong着色方式则在$fragmentShader$中实现光照计算,原理简单,不再赘述。
1
2
3
4
5
6
7
8
9
10
11
12
13
14
15
16
17
18
19
20
21
22
23
24
25
26
27
28
29
30
31
32
33
34
35
36
37
38
39
40
41
42
43
44
45
46
47
48
49
50
51
52
53
54
55
56
57
58
59
60
61
62
63
64
65
66
67
68
69
70
71
72
73
74
75
76
77
78
class PhongShader :public BaseShader{ private : const Light *m_light; const Material *m_material; const Texture2D *m_unit; Vector3D m_eyePos; Matrix4x4 m_modelMatrix; Matrix4x4 m_viewMatrix; Matrix4x4 m_projectMatrix; Matrix4x4 m_invModelMatrix; public : PhongShader(); virtual ~PhongShader() = default ; virtual VertexOut vertexShader (const Vertex &in) virtual Vector4D fragmentShader (const VertexOut &in) virtual void bindShaderUnit (Texture2D *unit) virtual void setModelMatrix (const Matrix4x4 &world) {m_modelMatrix = world;m_invModelMatrix = m_modelMatrix.getInverseTranspose();} virtual void setViewMatrix (const Matrix4x4 &view) virtual void setProjectMatrix (const Matrix4x4 &project) virtual void setMaterial (const Material *material) virtual void setLight (const Light *light) virtual void setEyePos (const Vector3D eye) }; VertexOut PhongShader::vertexShader(const Vertex &in) { VertexOut result; result.posTrans = m_modelMatrix * in.position; result.posH = m_projectMatrix * m_viewMatrix * result.posTrans; result.color = in.color; result.texcoord = in.texcoord; result.normal = m_invModelMatrix * Vector4D(in.normal); result.oneDivZ = 1.0 / result.posH.w; result.posTrans *= result.oneDivZ; result.texcoord *= result.oneDivZ; result.color *= result.oneDivZ; return result; } Vector4D PhongShader::fragmentShader(const VertexOut &in) { Vector4D litColor = in.color; if (m_unit) litColor = m_unit->sample(in.texcoord); Vector3D _amb, _diff, _spec; if (m_light) { Vector3D eyeDir = m_eyePos - in.posTrans; eyeDir.normalize(); m_light->lighting(*m_material, in.posTrans, in.normal, eyeDir, _amb, _diff, _spec); litColor.x *= (_amb.x + _diff.x + _spec.x); litColor.y *= (_amb.y + _diff.y + _spec.y); litColor.z *= (_amb.z + _diff.z + _spec.z); litColor.w = 1.0f ; } return litColor; }
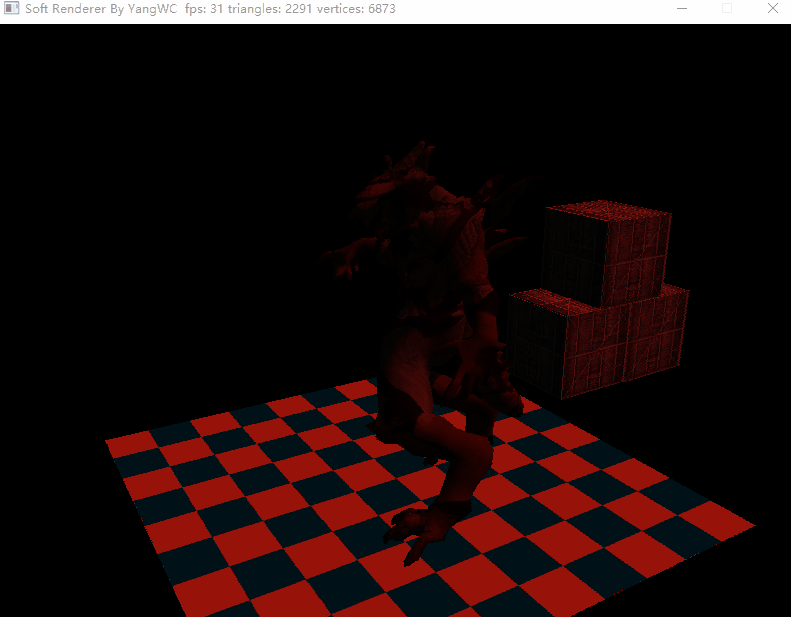
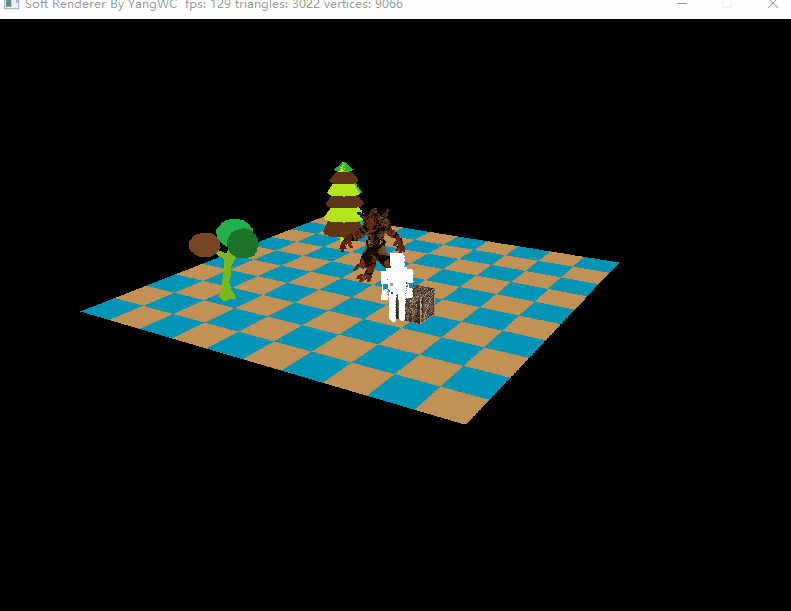
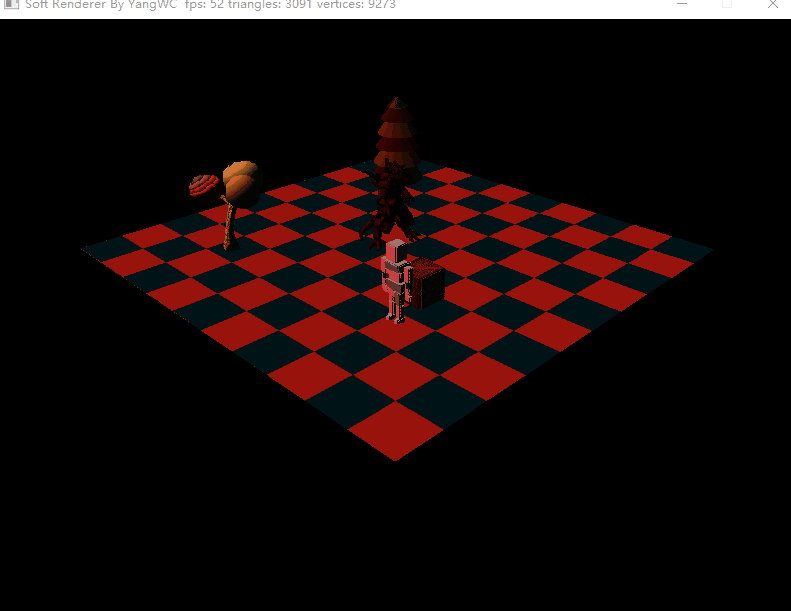
下图分别为Phong着色方式的平行光、点光源、聚束光效果:
三、虚拟场景漫游 虚拟场景漫游是一个三维程序必不可少的,我们比较常用的虚拟摄像机有两类:第一人称摄像机、第三人生摄像机。第三人称摄像机又称为半上帝视角,一般的rpg游戏都是采用的第三人称视角。摄像机一般都是相应键盘按键、鼠标移动、鼠标滚轮事件,为了方便描述,我们创建一个$Camera3D$虚类如下:
1
2
3
4
5
6
7
8
9
10
11
12
13
14
15
16
17
18
19
20
21
22
class Camera3D { public : static const Vector3D LocalForward; static const Vector3D LocalUp; static const Vector3D LocalRight; Camera3D() = default ; virtual ~Camera3D(){} virtual Matrix4x4 getViewMatrix () 0 ; virtual Vector3D getPosition () 0 ; virtual void onKeyPress (char key) 0 ; virtual void onWheelMove (double delta) 0 ; virtual void onMouseMove (double deltaX, double deltaY, std ::string button) 0 ; };
1、第一人称相机 LearnOpenGl的这篇 )对第一人称相机的构建做了的很详细的描述。不同的是,我不再采用欧拉角来描述渲染,而是采用了四元数(关于四元数,请看知乎的这篇 )。 理解了四元数,采用欧拉角反而比较繁琐。
1
2
3
4
5
6
7
8
9
10
11
12
13
14
15
16
17
18
19
20
21
22
23
24
25
26
27
28
29
30
31
32
33
34
35
36
37
38
39
40
41
42
43
44
45
46
47
48
49
50
51
52
53
54
55
56
57
58
59
60
61
62
63
64
65
66
67
68
69
70
71
72
73
74
75
class FPSCamera :public Camera3D{ private : mutable bool m_dirty; Vector3D m_translation; Quaternion m_rotation; Matrix4x4 m_viewMatrix; public : FPSCamera(Vector3D _pos); virtual ~FPSCamera() = default ; virtual Vector3D getPosition () return m_translation;} virtual Matrix4x4 getViewMatrix () virtual void onKeyPress (char key) virtual void onWheelMove (double delta) virtual void onMouseMove (double deltaX, double deltaY, std ::string button) void translate (const Vector3D &dt) void rotate (const Vector3D &axis, float angle) void setTranslation (const Vector3D &t) void setRotation (const Quaternion &r) Vector3D forward () const ; Vector3D up () const ; Vector3D right () const ; }; void FPSCamera::onKeyPress(char key){ switch (key) { case 'W' : this ->translate(forward() * 0.2f ); break ; case 'S' : this ->translate(-forward() * 0.2f ); break ; case 'A' : this ->translate(-right() * 0.2f ); break ; case 'D' : this ->translate(+right() * 0.2f ); break ; case 'Q' : this ->translate(up() * 0.2f ); break ; case 'E' : this ->translate(-up() * 0.2f ); break ; default : break ; } } void FPSCamera::onWheelMove(double delta){ } void FPSCamera::onMouseMove(double deltaX, double deltaY, std ::string button){ double speed = 0.1f ; deltaX *= speed; deltaY *= speed; this ->rotate(LocalUp, -deltaX); this ->rotate(right(), -deltaY); }
2、第三人称摄像机 第三人称有一个固定的目标,这个目标通常就是玩家操控的物体。摄像机可以拉远拉近、围绕目标在$xz$平面旋转、绕$x$轴上下旋转,而且摄像机永远在玩家的上方(即俯视)。为此,我们用$distance$(摄像机到玩家的距离)、$pitch$(绕$x$轴的旋转角)、$yaw$(绕$y$轴的旋转角)来获取摄像机的位置,最后获取了摄像机的位置后我们就可以直接用$LookAt$矩阵获得视图矩阵。更多关于第三人称摄像机方面的细节请看youtube上的这个视频 。
1
2
3
4
5
6
7
8
9
10
11
12
13
14
15
16
17
18
19
20
21
22
23
24
25
26
27
28
29
30
31
32
33
34
35
36
37
38
39
40
41
42
43
44
45
46
47
48
49
50
51
52
53
54
55
56
57
58
59
60
61
62
63
64
65
66
67
68
69
70
71
72
73
74
75
76
77
78
79
80
81
82
83
84
85
86
87
88
89
90
91
92
93
94
95
96
class TPSCamera :public Camera3D{ private : mutable bool m_dirty; Vector3D m_cameraPos; Transform3D m_player; Matrix4x4 m_viewMatrix; double m_yaw, m_pitch, m_distance; public : TPSCamera(Vector3D target); virtual ~TPSCamera() = default ; Matrix4x4 getPlayerMatrix () ; virtual Matrix4x4 getViewMatrix () virtual Vector3D getPosition () return m_cameraPos;} virtual void onKeyPress (char key) virtual void onWheelMove (double delta) virtual void onMouseMove (double deltaX, double deltaY, std ::string button) private : void update () }; void TPSCamera::onKeyPress(char key){ double speed = 2.0f ; switch (key) { case 'W' : m_dirty = true ; m_player.translate(-m_player.forward() * 0.1f ); break ; case 'S' : m_dirty = true ; m_player.translate(+m_player.forward() * 0.1f ); break ; case 'A' : m_dirty = true ; m_player.rotate(m_player.up(), +speed); break ; case 'D' : m_dirty = true ; m_player.rotate(m_player.up(), -speed); break ; } } void TPSCamera::onWheelMove(double delta){ m_dirty = true ; double speed = 0.01 ; m_distance += -speed * delta; if (m_distance > 35.0 )m_distance = 35.0 ; if (m_distance < 5.00 )m_distance = 5.0 ; } void TPSCamera::onMouseMove(double deltaX, double deltaY, std ::string button){ double speed = 0.2 ; if (button == "RIGHT" ) { m_dirty = true ; m_pitch += speed * deltaY; if (m_pitch < 0.0 )m_pitch = 0.0 ; if (m_pitch > 89.9 )m_pitch = 89.9 ; } else if (button == "LEFT" ) { m_dirty = true ; m_yaw += -speed * deltaX; fmod (m_yaw, 360.0 ); } } void TPSCamera::update(){ if (m_dirty) { m_dirty = false ; Vector3D target = m_player.translation(); float height = m_distance * sin (radians(m_pitch)); float horizon = m_distance * cos (radians(m_pitch)); Vector3D _playerRot = m_player.rotation().eulerAngle(); _playerRot.y = fmod (_playerRot.y, 360 ); m_cameraPos.y = target.y + height; m_cameraPos.x = target.x + horizon * sin (radians(m_yaw)); m_cameraPos.z = target.z + horizon * cos (radians(m_yaw)); m_viewMatrix.setLookAt(m_cameraPos, m_player.translation(), LocalUp); } }
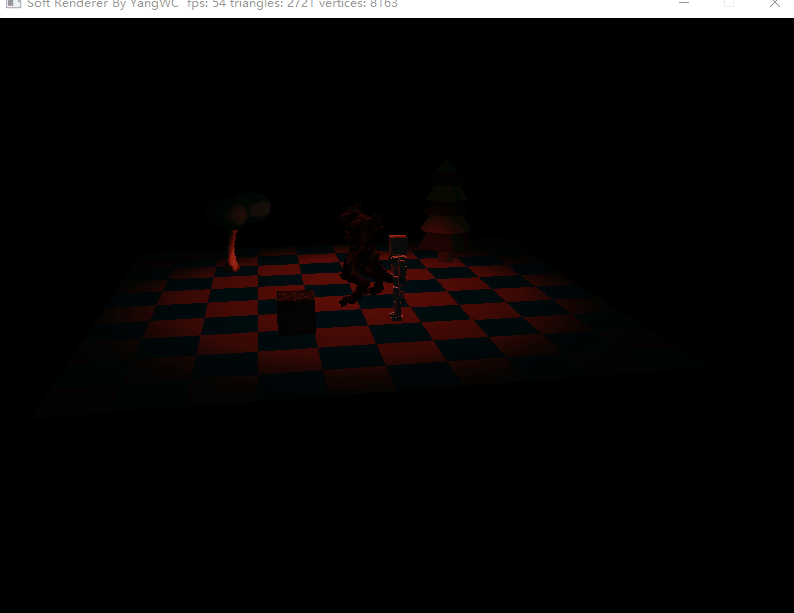
四、程序结果
五、结语 软渲染器的搭建就此告一段落,不借助任何图形库从零开始搭建这么一个渲染管线的初衷是为了更加深入地了解当前三维渲染的整个流程,很多理论东西需要实践才能彻底地理解。这么几天关于搭建软渲染器的折腾让我收获不少,这为以后的图形学道路打下了深厚的基础。目前我实现的软渲染管线已经包含了一个传统固定管线的基本功能,我借助一些工具统计得软渲染管线的核心代码(不包括空行、注释)共2838行。不再打算加入更多的功能特性如透明融合、阴影等等,因为没必要了。相关的全部源代码已经提交到github上,请点这里 。
由于本人的知识水平有限,若发现任何bug或者博文叙述错误,欢迎指正,感谢!
参考资料 $[1]$ https://learnopengl-cn.github.io/02%20Lighting/02%20Basic%20Lighting/
$[2]$ https://learnopengl-cn.github.io/01%20Getting%20started/09%20Camera/
$[3]$ https://www.youtube.com/watch?v=PoxDDZmctnU&list=PLRIWtICgwaX0u7Rf9zkZhLoLuZVfUksDP&index=19
$[4]$ https://github.com/ssloy/tinyrenderer/wiki


 | YangWC's Blog&pics=https://cdn.jsdelivr.net/gh/ZeusYang/CDN-for-yangwc.com@1.1.42/blog/TinySoftRenderer/renderer2.jpg&summary=本渲染器已完全重构,与之前版本大不相同,详情移步至TinySoftRenderer。)
 | YangWC's Blog&pics=https://cdn.jsdelivr.net/gh/ZeusYang/CDN-for-yangwc.com@1.1.42/blog/TinySoftRenderer/renderer2.jpg&summary=本渲染器已完全重构,与之前版本大不相同,详情移步至TinySoftRenderer。)
 | YangWC's Blog&pics=https://cdn.jsdelivr.net/gh/ZeusYang/CDN-for-yangwc.com@1.1.42/blog/TinySoftRenderer/renderer2.jpg&summary=本渲染器已完全重构,与之前版本大不相同,详情移步至TinySoftRenderer。)